脂肪球分配器
Birdhouse for fat balls.
Description
Fat balls are quite common to feed tits. Here you can build a dispenser that protects the fat balls from rain and snow. The design was tested using 4mm plywood for the main structural parts. For the spacer of the locking mechanism two layers of 3mm plywood have been stacked. The poles were made from 8mm diameter beech rod and 19cm in length. Some basic consistency checks have been made for different numbers, but only the defaults have ever been built.
The final dispenser consists of two parts which slide into each other. You can mount a hook to hang it into a tree. All edges that have angles different from 90 degrees (chamfers) have engraved guiding lines which indicate the angle. You have to sand the edge such that the pieces fit together.
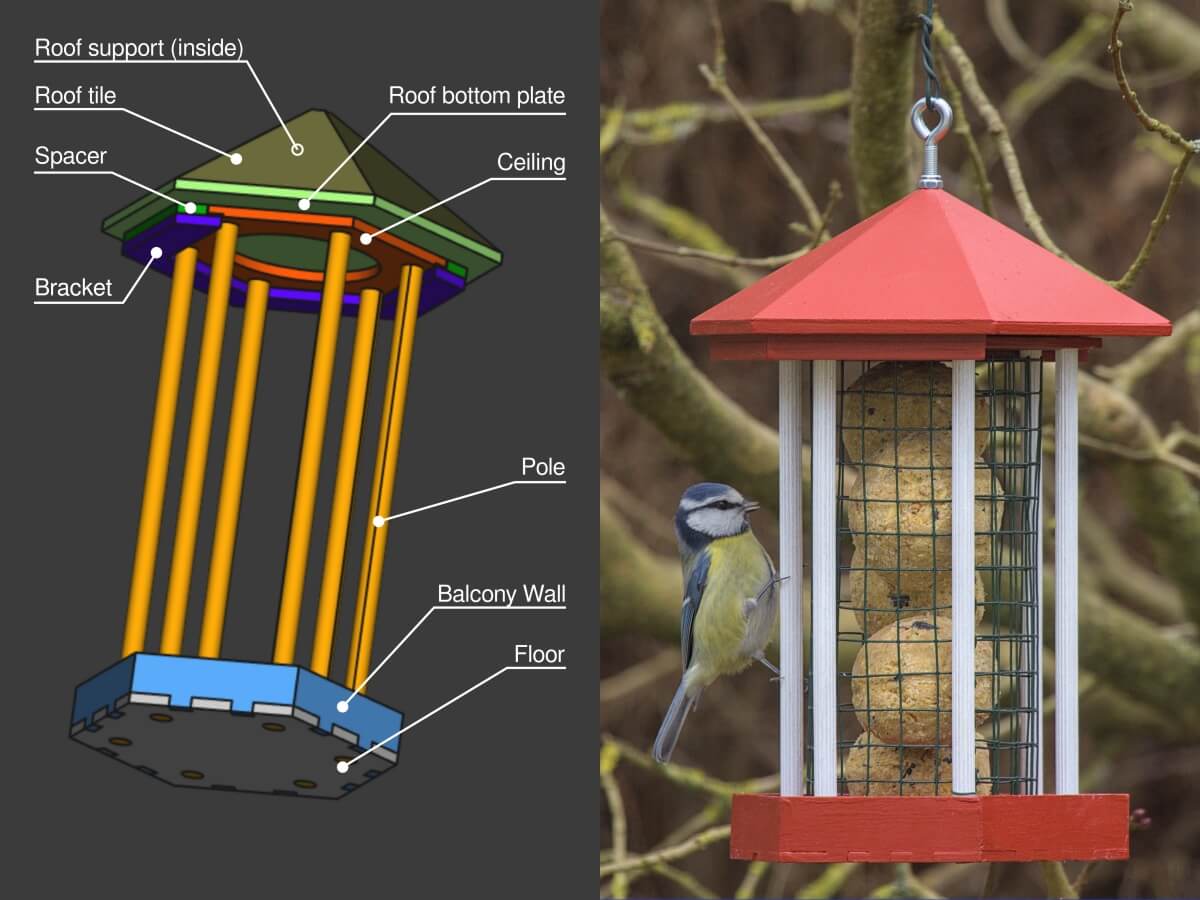
The top part (roof) consists of the the following elements for a N sided dispenser:
- The N sided roof bottom plate which supports the roof tiles. It has a central cut out which is needed for assembly and on the bottom side an engraved line which indicates the position of the mounting bracket.
- N triangles forming the roof. They also have a small arc at the tip (roof_hole_diameter) which acts as a drilling guide if you want to mount a hook.
- The N sided roof support piece which has a central hole for the hook. It is been mounted to the roof tiles through the hole in the roof bottom plate to support the roof tiles and acts as a mounting plate for the hook.
- Spacer(s); in the reference builds 2 spacers using 3mm plywood have been used. The spacer needs to be a bit thicker than the ceiling (see below). That's the smaller "U" shaped part which is glued to the bottom side of the roof bottom plate.
- The bracket is also "U" shaped and a bit wider than the spacer. This is glued to the bottom of the spacer and holds the cage (bottom part).
The bottom part (cage) consists of the following elements:
- The ceiling is N sided with the central refill hole and N smaller holes into which the poles are fitted.
- The N sided floor part with finger joints for the balcony walls and holes for the poles. A central hole to drain rain water can be added as well.
- N balcony walls surrounding the floor.
- N poles that join floor and ceiling (not part of the drawing)
Other parts needed for assembly:
- Wooden rod (N times the length of the poles).
- A hook (e.g. M5x50mm)
- A washer to distribute the load of the hook to the support piece
- One or two nuts to secure the hook
- Optional, a piece of wire mesh
Assembly:
- Sand all chamfers
- Glue balcony walls to the floor
- Glue pairs of roof tiles and use the roof bottom plate as a jig, Hot glue may be used to tack the parts.
- Glue all roof tiles to form the roof
- Glue spacer(s) and the bracket into a stack
- Glue roof tiles to the roof bottom plate and attach the support piece
- Glue the stack to the roof bottom plate
- Cut the poles to length
- If you want to use multiple colors paint now, otherwise you also can paint later
- After painting you may need to get the paint out of the pole holes again using a drillbit
- Glue the poles into floor plate and ceiling
- Attach the hanger
- Attach the wire mesh